Implementing a custom scrollbar in Win7 Simu
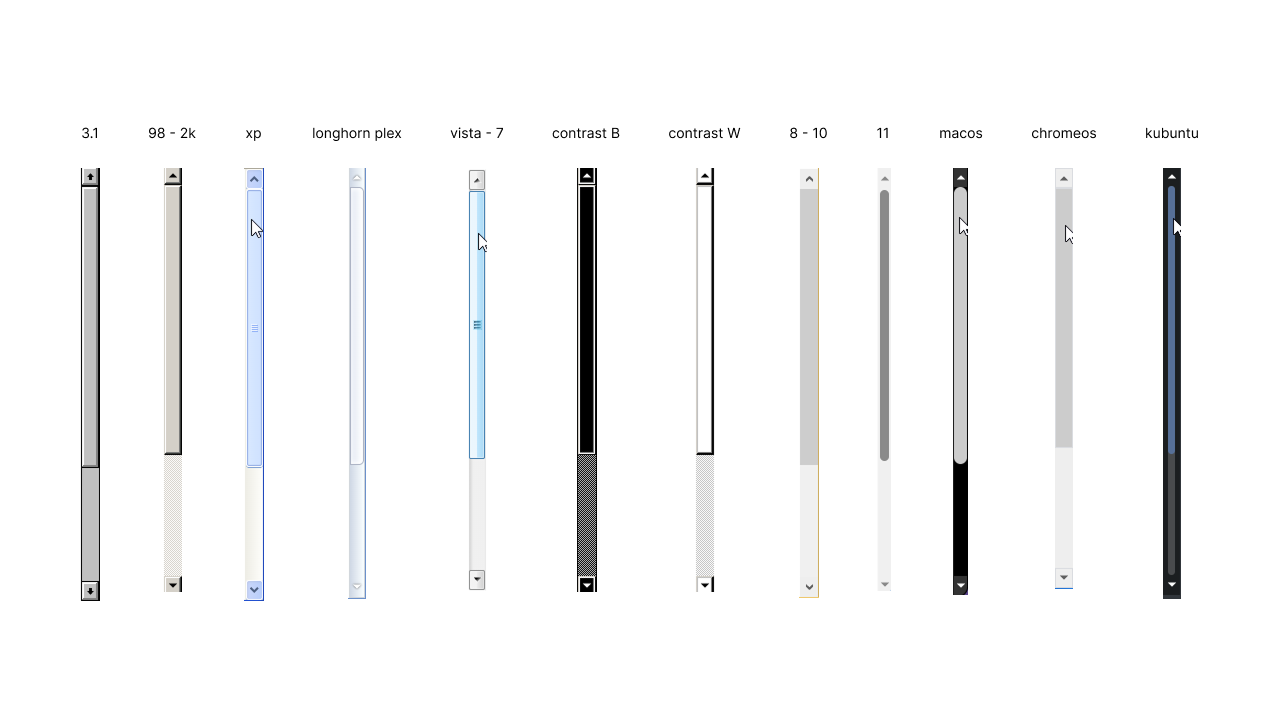
The custom scrollbar in different OS themes
Finally got the time to write and share about some more technical details of Win7 Simu! Since version 4.2.0, we have added a custom scrollbar to Win7 Simu. In this post, let's dive into how the custom scrollbar was done. Hopefully, you will find it useful if you are looking to implement something similar in your project, and also get a better understanding of the technical challenges and caveats behind it. Let's get started!
The need for a custom scrollbar
Being a simulator of Windows 7, one of the key goals of Win7 Simu is to provide an authentic and faithful experience of using Windows 7. Having a custom scrollbar that closely resembles the one in Windows 7 is essential to achieving this goal.
Additionally, with the ability to switch between different OS themes provided by Win7 Simu, and the fact that different browsers (Chrome, Firefox, Safari, Edge, etc.) and platforms have their own default scrollbar styles, a custom scrollbar allows us to freely customize the styling of the scrollbar to match the desired theme while maintaining cross-platform consistency in the appearance and behavior of the scrollbar.
Just the above reasons are already enough for us to implement the custom scrollbar, but as we progressed with the implementation, we also found that it can help us circumvent some issues we have with the native scrollbar, and provide a better user experience for users using touch devices, which is a worthwhile bonus!
The implementation
The design
The implementation goal for the custom scrollbar is based on an it-just-works principle. It can be integrated by wrapping it around the scroll content element and it will handle everything, no additional configuration needed.
<scrollbar-container>
  <!-- The scroll content element here. -->
</scrollbar-container>
Inside the scrollbar container are a slot for the scroll content, a vertical and a horizontal scrollbar component. The scrollbar container reads and listens for changes of the scroll content via the slot and automatically updates the other two scrollbar components accordingly. It also injects several custom classes to style the scroll content element correctly and to hide the system scrollbar from appearing alongside the custom scrollbars.
<!-- ScrollbarContainer.vue -->
<!-- Note: some codes are omitted for brevity. -->
<div class="scrollbar__wrapper">
  <slot />

  <!-- Vertical scrollbar -->
  <scrollbar />

  <!-- Horizontal scrollbar -->
  <scrollbar />
</div>
The scrollbar component contains four main parts: a scroll up/left button, a scroll down/right button, a scroll thumb, and a scroll track. The entire component is constructed using only <div> and <button> elements, providing us great controls over styling, and better yet, animating it, which is not possible with scrollbar pseudo-elements at the time of this writing.
<!-- Scrollbar.vue -->
<!-- Note: some codes are omitted for brevity. -->
<div class="scrollbar">
  <button class="scrollbar__btn"></button>
  <div>
    <!-- ... -->
    <button class="scrollbar__btn is-thumb"></button>
  </div>
  <button class="scrollbar__btn"></button>
</div>
The functionalities
The custom scrollbar does mainly two things:
- Sync the scroll progress. It includes updating the scroll thumb height to represent the amount of scrollable content and updating the position of the scroll thumb to represent the scrolling progress.
- Scroll the content when it is interacted.
Syncing
The scrollbar container reads the scroll content from the default slot and listens for scroll events, resize events via ResizeObserver, and changes inside the element via MutationObserver to update the scrollbars. The scroll thumb position and its height are calculated in percentage as it's more intuitive than seeing arbitrary, random pixel values. The scrollable content's scrolling states can be queried via scrollTop/scrollLeft, scrollHeight/scrollWidth, and clientHeight/clientWidth. These values are all in pixels so we had to convert them all to percentage to properly position the scroll thumb.
The example code below shows how the scroll thumb height (this.thumbHeight) and its top position (this.thumbTop) are calculated for the vertical scrollbar. We're basically mapping one value range (pixels) to another one (percentage). The same thing applies to the horizontal scrollbar but clientWidth, scrollWidth, and scrollLeft are used instead. The scroll thumb height is capped at MIN_THUMB_HEIGHT (the acceptably smallest possible size the thumb can get), otherwise, it could get ridiculously small or even disappear entirely if the scroll content were large.
const scrollRatio = this.element.clientHeight / this.element.scrollHeight;
this.thumbHeight = Math.max(scrollRatio * 100, MIN_THUMB_HEIGHT);
const maxScrollable = this.element.scrollTop / (this.element.scrollHeight - this.element.clientHeight);
this.thumbTop = maxScrollable * (100 - this.thumbHeight);Scrolling
When the custom scrollbar is interacted with by the user, it now has to handle the scrolling. This can be effortlessly done by setting new values to the scrollTop or scrollLeft properties of the scroll content. When updating those properties, the browser will trigger a scroll event and because the scrollbar is already listening for the scroll event, it will update the scroll thumb automatically. The scrollTop, scrollLeft, MouseEvent, and PointerEvent accept/return values in pixels so we didn't have to convert anything to percentage here.
There are a handful of different interactions that the scrollbar must support, like dragging the scroll thumb, clicking on the scroll track, and clicking on the scroll buttons.
Handling scroll buttons is quite easy, we only had to add/remove a specific scroll step (it's 20px in our case) to/from scrollTop or scrollLeft whenever the buttons are clicked. The scroll event is still triggered and the scrollbar still automatically updates itself.
For handling the scroll track click input, it requires calculating the click point relative to the scroll track and then translating it to the appropriate pixel value for scrollTop/scrollLeft. The code below shows how it's done for the vertical scrollbar.
/** @param {MouseEvent} event */
handleTrackClick(event) {
  const track = this.$refs.scrollbar;
  const rect = track.getBoundingClientRect();
  const thumbHeightPx = (this.thumbHeight / 100) * track.clientHeight;
  const clickY = event.clientY - rect.top;
  const thumbTopPx = clickY - thumbHeightPx / 2;
  const maxThumbTravel = track.clientHeight - thumbHeightPx;
  // clamp(v, min, max) = Math.max(Math.min(v, max), min)
  const clampedThumbTop = clamp(thumbTopPx, 0, maxThumbTravel);
  const maxScroll = this.element.scrollHeight - this.element.clientHeight;
  const scrollRatio = clampedThumbTop / maxThumbTravel;
  this.element.scrollTop = scrollRatio * maxScroll;
  // ...
},
Last but not least, handling scroll thumb dragging is a bit trickier. For instance, in the code below for handling scroll thumb dragging for the vertical scrollbar, we have a handleThumbDragStart() method to record the initial position when the dragging is initiated and then attach two global event listeners pointermove and pointerup to handle the dragging, dragging end, and to clean up all the global event listeners, otherwise, memory leaks could occur. The global events are used to keep the scrolling uninterrupted when the cursor moves outside the scroll thumb or the scrollbar area. Also, PointerEvent is used so that it could work on devices with touch interface.
/** @param {PointerEvent} event */
handleThumbDragStart(event) {
  this.isThumbDragged = true;
  this.dragStartY = event.clientY;
  this.dragStartScrollTop = this.element.scrollTop;
  const target = event.target;
  target.setPointerCapture(event.pointerId);
  document.addEventListener("pointermove", this.handleThumbDrag);
  document.addEventListener("pointerup", this.handleThumbDragEnd);
},

/** @param {PointerEvent} event */
handleThumbDragEnd(event) {
  this.isThumbDragged = false;
  const target = event.target;
  target.releasePointerCapture(event.pointerId);
  document.removeEventListener("pointermove", this.handleThumbDrag);
  document.removeEventListener("pointerup", this.handleThumbDragEnd);
},
The handleThumbDrag() method will then calculate the delta value (how many pixels the pointer has moved from its initial dragging start position) whenever the pointer moves and translate it to the proper pixel value for scrollTop.
/** @param {PointerEvent} event */
handleThumbDrag(event) {
  if (!this.isThumbDragged) return;
  const track = this.$refs.scrollbar;
  const thumbHeightPx = (this.thumbHeight / 100) * track.clientHeight;
  const maxThumbTravel = track.clientHeight - thumbHeightPx;
  const maxScroll = this.element.scrollHeight - this.element.clientHeight;
  const deltaY = event.clientY - this.dragStartY;
  const scrollDelta = (deltaY / maxThumbTravel) * maxScroll;
  this.element.scrollTop = this.dragStartScrollTop + scrollDelta;
},
Caveats, improvements, and future work
As happy as we are to have the custom scrollbar implemented and working to provide a better experience for users, we also want to be transparent about some caveats and limitations, and share some thoughts on potential improvements and future work.
As you can see from the implementation details above, implementing a custom scrollbar is not a trivial task, and it does add some complexity to the DOM structure and maintenance of the codebase. We need to carefully manage the state and synchronization between the custom scrollbar and the content it controls, which can be error-prone and require extra care in future updates and maintenance.
The extra DOM elements and event listeners needed for the custom scrollbar can also have performance implications, especially on lower-end devices. We need to monitor user feedback and performance metrics to ensure the custom scrollbar is not causing significant performance issues, and optimize the implementation as needed.
And with the reliance on modern web APIs such as ResizeObserver and MutationObserver, unfortunately, there is no way to support older browsers or WebView versions that do not have support for these APIs, which means users on those platforms will not be able to experience the custom scrollbar. It is a trade-off we have to make in order to provide the best experience for the majority of users, but it is still something we want to be transparent about.
With that said, having the custom scrollbar implemented opens up a lot of possibilities for future improvements and features. For example, we can incorporate more customization options for the scrollbar into Theme Studio, allowing users to further personalize their experience. We can also provide additional advanced settings for the scrollbar, such as adjusting the scroll speed, enabling/disabling smooth scrolling, and more.